Photographing Jagalchi Market, the Three Positions and the Half-Hour That Works
Where to stand, how low to drop the camera, and the one half-hour each day when the signboard lights and the remaining sky overlap
The Short Answer
Jagalchi has three photo positions. On the street, drop the camera to plate height at the display case and shoot the road diagonally from the pavement edge. At the tank, press the lens to the glass, shade around it, turn the flash off and focus on the eye of the fish. At the table, stand up and shoot straight down once every accompaniment has arrived, then take the platter at 45 degrees from the window side within 3 minutes. Come in the thirty minutes after sunset, around 19:30 in summer and 17:30 in winter, and always ask before photographing a face. 220m from Jagalchi Station Exit 2.
수정횟집
Where the photographs actually come out well at Jagalchi Market
Jagalchi Haean-ro
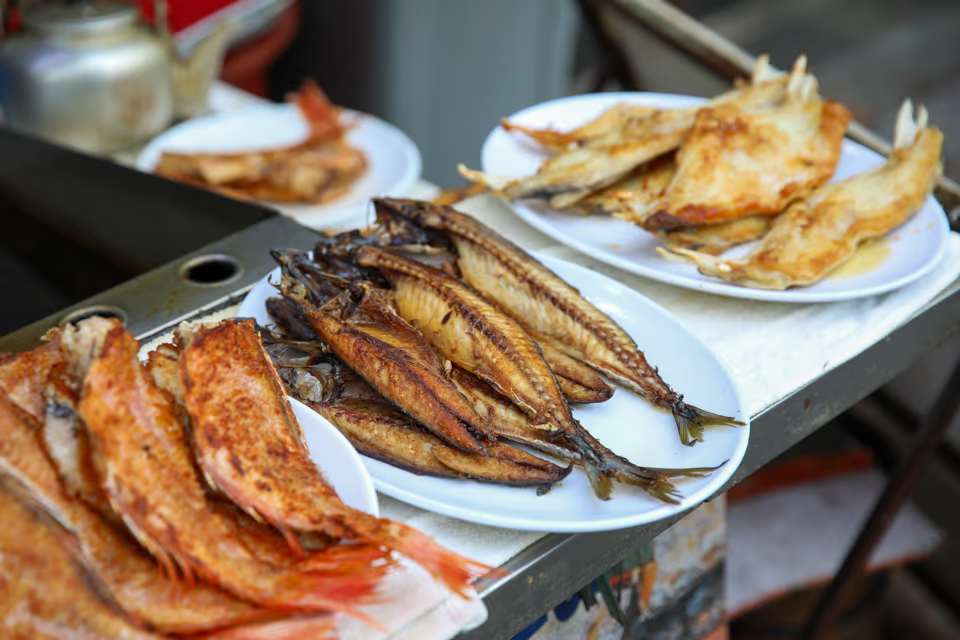
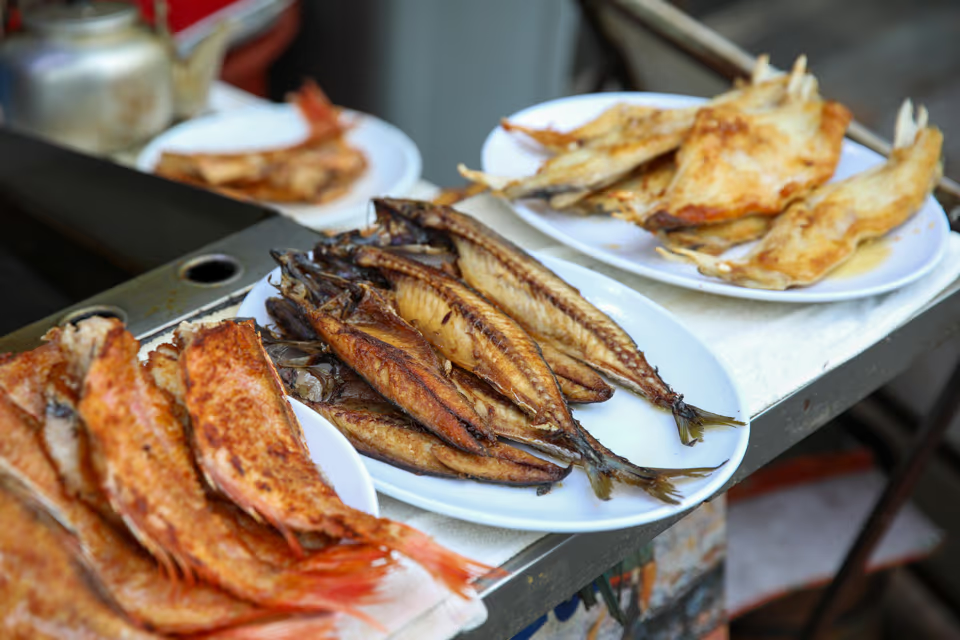
The display case in front of a shop and the market street itself are where the photographs come out best. Walk along Jagalchi Haean-ro and every sashimi restaurant sets out plates of grilled fish and a live fish tank by its door, and that display case becomes the backdrop that holds the atmosphere of the market in a single frame. Rockfish, mackerel and flounder lined up plate by plate wants one step closer and the camera brought down to plate height rather than a shot from a distance, which is what makes the grain of the grilled skin come alive. Eight in ten guests shoot the display case looking down from above, and that flattens the plates. Bring the camera down level with the plates and frame it so the signboard behind catches slightly in the top of the shot, and you get a photograph that needs no caption explaining where it was taken. When you want the whole market street, standing at the edge of the pavement on the shop side rather than in the middle of the road, so the street runs away diagonally, is what creates depth. As the restaurant veteran with over a decade at Jagalchi sees it, the front of a display case is the position with the fewest failures at any hour of the day.
Before You Shoot
- Dropping the camera level with the plates brings out the grain of the grilled skin
- Shoot diagonally from the pavement edge rather than the middle of the road for depth
- Letting the signboard catch slightly in frame means the place needs no caption
수정횟집
How to photograph the fish tank so the reflection disappears
Jagalchi Haean-ro
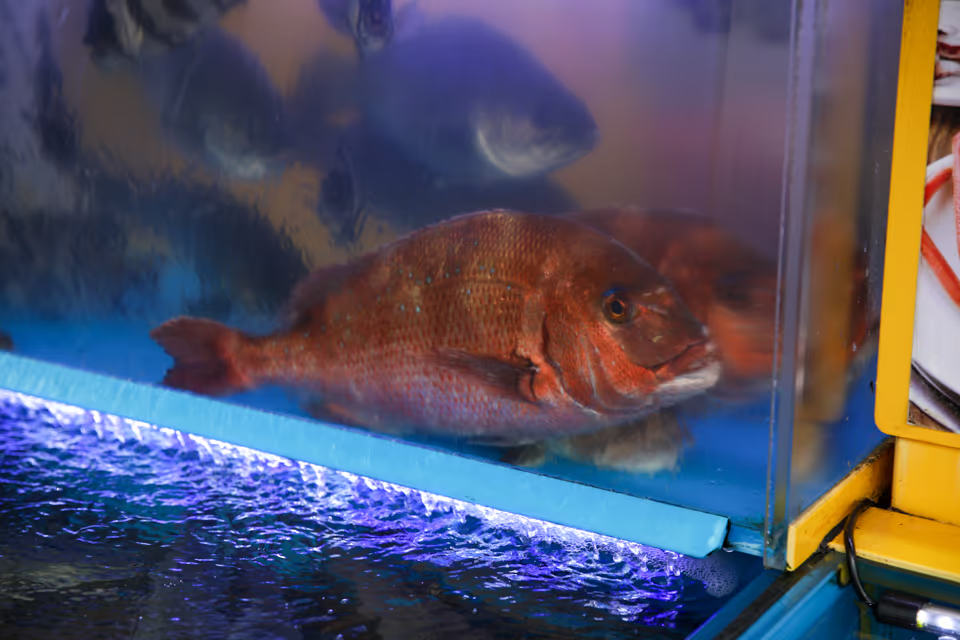
Pressing the lens almost against the glass and shooting straight on is what makes the reflection disappear. The live fish tank out front has a single sheet of glass that catches the daytime sky and everyone walking past, so a shot taken one step back photographs your own face instead of the fish. Putting a hand on the glass to shade around the lens creates a dark backdrop and lets the colour in the water come up as it actually is. Do not use the flash. It plants a white dot on the glass and startles the fish into a corner. For posture, crouching down and aiming at the mid-height of the water compartment works best, and species that sit on the bottom like flounder want a slightly downward angle while species that swim freely like sea bream want a shot from the side. The earlier the hour and the clearer the water, the cleaner the photograph, while in the evening the light above the tank comes on and the water turns blue, and that colour is itself the signature of a Jagalchi photograph. Set the focus on the eye of the fish and the photograph holds even if everything else goes soft. If you want to catch the water droplets splashing over the edge, shooting about ten frames in burst mode and picking one is the faster route.
Before You Shoot
- Press the lens to the glass and shade around it with a hand to remove the reflection
- Turn the flash off and put the focus on the eye of the fish
- Bottom-dwelling species want a downward angle, free-swimming species a side view
수정횟집
What composition makes a sashimi table look full in a photograph
Jagalchi Haean-ro
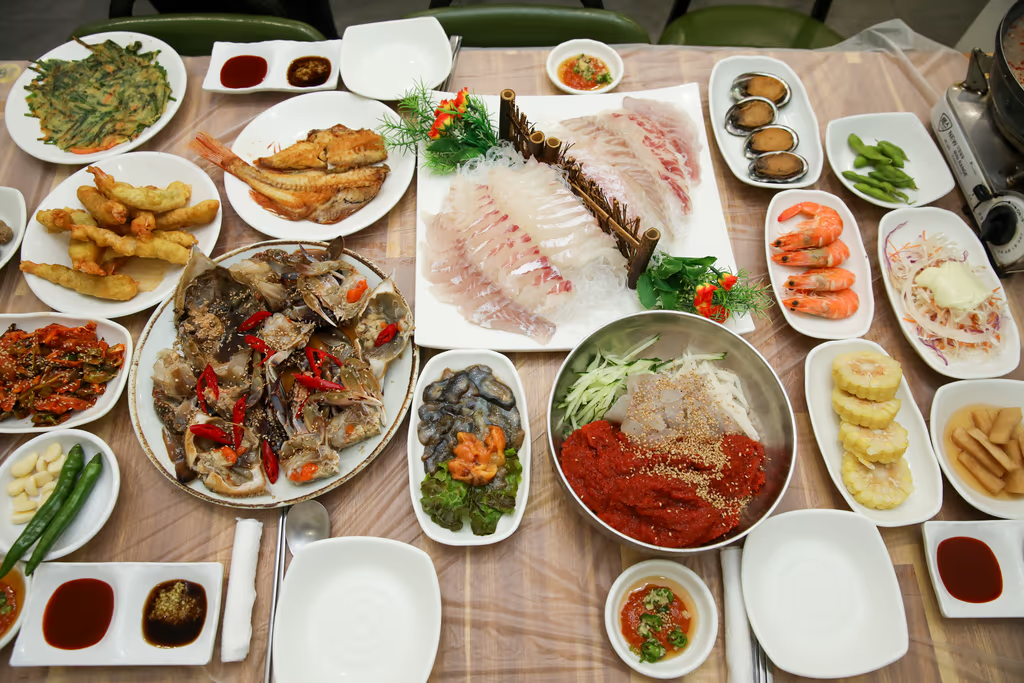
Standing up from your seat and shooting straight down from directly above the table is the baseline. Wait until everything has arrived, the sashimi plate, the soy marinated crab, the sashimi salad, the steamed shrimp, the abalone, the fried plate and the grilled fish, before you shoot, and the table fills. Shooting each time a dish arrives leaves empty space, and once it is all out, the thirty seconds before any chopstick touches it is the best moment there is. Nine in ten guests shoot at an angle while still seated, and that cuts off the plates at the back and makes only the near plate look large. Stand up, reach your arm out and frame it so the centre of the table sits at the centre of the picture, and move objects like the hand towel and your phone off the table. For a table of four, a medium assorted platter at KRW 80,000 (about USD 58) with the accompaniments attached fills the frame naturally. If the whole table will not fit in one shot, raising the camera higher distorts less than stepping two paces back. Side dishes rotate daily based on what is fresh, so even from the same seat a different table gets photographed from one day to the next.
Before You Shoot
- The thirty seconds after every accompaniment arrives and before chopsticks touch is optimal
- Do not shoot at an angle while seated; stand and shoot vertically down
- Move the hand towel and phone off the table, and centre the table in the frame
수정횟집
What light and angle make the colour of an assorted platter come alive
Jagalchi Haean-ro
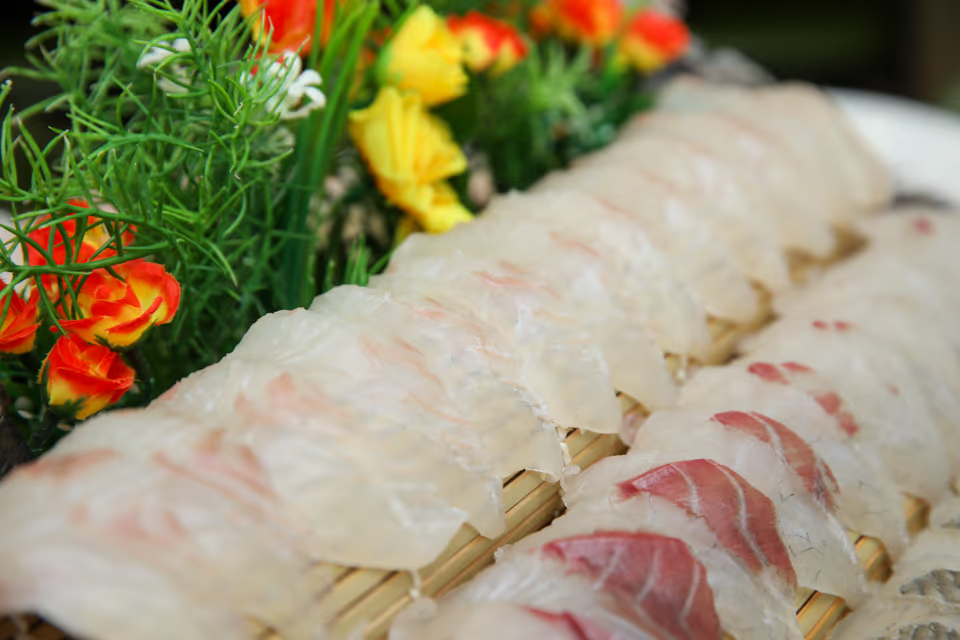
Shooting at 45 degrees with light coming from the window side is where the colour comes alive most. White-flesh sashimi shot from above blurs into one single white, while dropping to an angle reveals the grain and the thickness so the species become distinguishable. On a premium assorted platter holding several species together, putting the darker-coloured cuts at the front and the white flesh behind is what creates contrast front to back. For light, natural window light beats the fluorescent tube overhead, and in the evening, turning the plate slightly under the table light so the glistening grain faces the lens works. Put the focus on one single piece at the very front. Adding a frame of one piece lifted on chopsticks shows the thickness at a glance, and that single photograph gets a better response than the whole plate. For the premium wild-caught platter from KRW 80,000 (about USD 58) at the day-selected species price, asking the species names is worth doing so captions come easily later. Sashimi left at room temperature dries at the surface and loses its sheen, so shoot within 3 minutes of it arriving and then eat it.
Before You Shoot
- Darker species at the front and white flesh behind creates the contrast
- Focus on one piece at the very front, then take one more of a piece lifted on chopsticks
- Shoot within 3 minutes of arrival and eat it, or the sheen goes
수정횟집
What time of day is best for photographing Jagalchi
Jagalchi Haean-ro
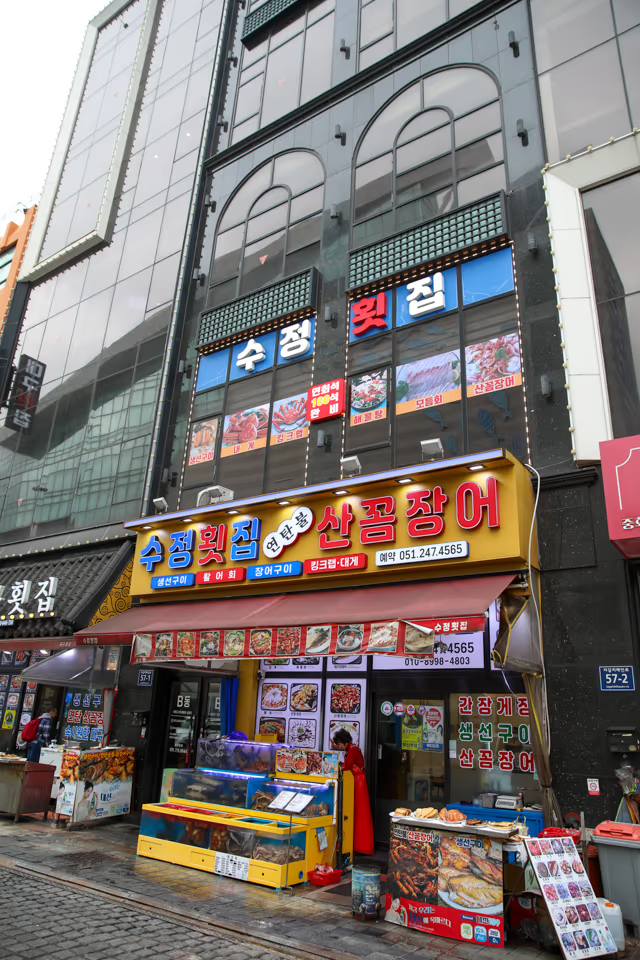
The thirty minutes after the sun goes down, when the signboards have lit and blue still remains in the sky, is the best there is. In daylight the display cases and tanks photograph sharply but the sky blows out white, and once night deepens only the signboards are bright and everything around them sinks to black. In the window between, framing a shop front from across the street puts the charcoal hagfish signboard, the tank lighting and the entrance lights all in one picture. By season that window is around 19:30 in summer and around 17:30 in winter. Around 7 PM on a weekend is the busiest hour, so to shoot without people in frame, a weekday evening or half an hour earlier than that is better. If you want daytime shots, before 11 AM is good: the plates just set out on the display case have not been disturbed and the street is thin of people. On a rainy day the lighting reflects off the ground and evening photographs actually come out better, but a hand holding an umbrella shakes, so brace your arm against a railing or a post. Once the sun has fully set, pulling the exposure down slightly keeps the signboard lettering from blowing out white.
Before You Shoot
- Around 19:30 in summer and 17:30 in winter is when signboard and sky light overlap
- Before 11 AM for daytime shots, fewer people and the display case still tidy
- Pull the exposure down slightly after full dark so the signboard lettering holds
수정횟집
What etiquette and walking route to keep when photographing in the market
Jagalchi Station Exit 2, 220m
Asking first before you photograph a person is the etiquette at Jagalchi. Photographs of a vendor hands, their knife or a plate being filled are almost always permitted gladly, but a photograph where a face appears large needs to be mentioned in advance. Eight in ten visitors shoot without asking and then watch for a reaction, when in fact plenty of vendors will turn the plate toward the camera for you once you have asked. Standing in the middle of the aisle to shoot for a long stretch is also worth avoiding. It is a path where carts and water buckets pass through so collisions happen easily, and the floor is wet, which means people stepping backwards slip from time to time. For the route, coming down 220m from Jagalchi Station (Line 1) Exit 2 toward Jagalchi Haean-ro while photographing the display cases and tanks, then shooting the table and the plates at your meal, then coming back out around sunset to finish with the signboards, is the order that walks the shortest distance. The market main hall is a 3-minute walk and BIFF Square 5 minutes, so adding snack photographs at the square after the meal still fits in one evening. With 190 seats across the first and second floors there is room to photograph the table even when a group comes together.
Before You Shoot
- Always ask first before taking a photograph where a face appears large
- Do not stand long in the middle of the aisle, and never step backwards on a wet floor
- Shoot coming down from the station, then come back out at sunset, one direction and short
| Item | Price | Notes |
|---|---|---|
| Assorted Platter, Small | KRW 60,000 | About USD 43 · for 2, the plate-shot standard |
| Assorted Platter, Medium | KRW 80,000 | About USD 58 · the size that fills a four-person top-down frame |
| Assorted Platter, Large | KRW 100,000 | About USD 72 · for 5 to 6 |
| Premium Wild-Caught Sashimi | From KRW 80,000 | Day-selected species price, ask the names for your captions |
| Sashimi Set Meal | KRW 20,000 | About USD 14 · for eating and shooting alone |
Jagalchi Photography FAQ
Nearby Photo Spots
Jagalchi Market main hall
3-minute walkLive and fresh fish shops, tanks and vendors to photograph
BIFF Square
5-minute walkSsiat-hotteok being made, good for snack photographs
Yeongdo Bridge
7-minute walkDeck lifts Saturdays at 2 PM, a timed shot by the water
Yongdusan Park
12-minute walkBusan Tower and the harbour from above at dusk
Before You Shoot
- Drop the camera to plate height on the street, not above it
- Press the lens to the tank glass and turn the flash off
- Stand up for the table shot and take it before any chopstick touches
- Come in the half-hour after sunset for the signboard and sky together
- 220m from Jagalchi Station Exit 2 toward the coastal road, about a 3-minute walk
Suggested Photo Route
A One-Direction Photo Route Ending at Blue Hour
- Come down 220m from Jagalchi Station Exit 2, display cases at plate height
- Fish tanks with the lens on the glass, flash off, focus on the eye
- Order a medium platter, table shot straight down before chopsticks
- Plate at 45 degrees from the window side, one piece on chopsticks
- Back outside for the signboards while blue remains in the sky
What to Shoot Where
Outside, the street positions
- Display case at plate height
- Live fish tank
- Shop front at dusk
At the table
- Top-down full table
- Platter at 45 degrees
- One piece on chopsticks
After the meal nearby
- Market main hall
- BIFF Square snacks
- Yongdusan Park at night
On Jagalchi Haean-ro, a Jagalchi ajimae with over 10 years of experience sets the display case out front at any hour of the day
Medium platter KRW 80,000 for a four-person frame · Tanks lit from evening · 220m from Jagalchi Station Exit 2
Read the full guide